

How to Center Your Blog Header on Blogger
in Blog Tips, Blog Tutorials, Blogger Tutorials, Not For Commercial Use on November 26, 2012How to Center Your Blog Header on Blogger

Hello everyone! Tiffany here! It’s so great to be here and to begin sharing all kinds of tips with you! Today I’m going to share a very simple trick to get your blog header to be centered!!
The blogger template I’m using is probably one of the most popular ‘Picture Window’, but this tip can be used with most any template!

The problem is the width of my blog is actually wider than my pretty header image. Don’t you just love this pretty header? It was a freebie from Keren, find it here at Free Pretty Things for You! Before I added it to my blog I brought it into Photoshop and added a lovely verse!

But it would look a lot better if it were centered on top of my blog! So here are a couple of quick steps to make that happen!
How to Center Your Blog Header on Blogger
1. First go to TEMPLATE > CUSTOMIZE > ADVANCED > ADD CSS
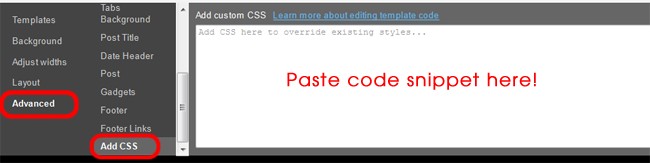
2. Choose the code that best fits your needs below! Copy & Paste it in the space as shown above. *Please Note* Hit your ENTER Key after you paste the code snippet.
Option A: If you used “INSTEAD OF TITLE AND DESCRIPTION“ option:
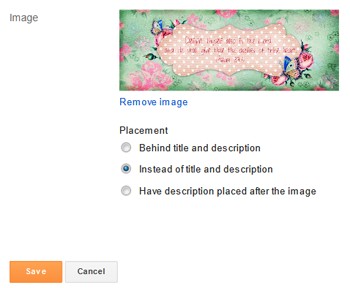
With this option the image was added as a <img> HTML element. Use these code snippets to align the element.
To Center:
[showmyads]
To Align Right:
The ‘300’ number can be adjusted higher or lower to move your image left or right.
To Align Vertically:
The ’50’ number can be adjusted higher or lower to move your image up or down. This code snippet can be used in conjunction with the 2 above.
Option B: If you used “BEHIND TITLE AND DESCRIPTION“ option:
When you choose this option, Blogger added your header image as a background to the header. To align it you need to add one of the follow snippets of code:
To Center:
To Align Right:

All Done!! Oh that is so much better!! Below are a few extra aligning tips for your headers!!
Line Up Your Header Text
If you would like to Line Up your Header Text (Title & Description) then use of one these snippet codes: These codes will work with text-only header and the text in “Behind Title & Description” image placement option.
To Center:
To Align Right:
To Align Vertically:(apply top padding)
The ’50’ number can be adjusted higher or lower to move your image up or down. This code snippet can be used in conjunction with the 2 above. Also, to adjust the Description use .descriptionwrapper
Line Up Image & Text Side by Side
Use one of these snippets if you want to split up your header into 2 parts positioned side by side, an image and text: These codes will work with the “Behind Title & Description” image placement option.
To Place Image on Left & Text on Right:
Increase left padding to push away texts to the right of the image header
To Place Text on Left & Image on Right:
Increase right padding to push away texts to the left of the image header.
It has been such a pleasure to share this tip with you today! Feel free to share your comments or questions below!
Swing by my shop at Tiffany Doodles Digital Stamps any time! I’d love to have you over! At least come by and pick up a new freebie every Thursday! =)

How wonderful is this!!! Tips from Tiffany on the one and only Free Pretty Things for you!!!! LOVE IT and love the addition to the blog my friend…it is AWESOME for all of us that are “digitally impaired” !!!! Thank you for always being so incredibly thoughtful and always lending a helping hand! A BIG thanks to you too Tiff…if I may call you that : ) you ROCKED this tutorial…(shhhhh….don’t tell anyone…especially my son…I actually think i understood it : ) lol!!! we don’t want that to get out then that would mean more work for me! Take care girls and THANK YOU THANK YOU THANK YOU!!!!! tons of hugs!!!! Here’s to MANY more tips from Tiffany!!! : )
Thanks for the enthusiastic feedback Andrea!! We would love to hear thoughts on future tips and tricks too!! Thanks a bunch!
Thankyou tifanny!
i’ve been looking for this tutorial. helpful as always!
GBU unlimited :)
thank you so much, tiffany! this was super helpful and easy to follow. i’ll be by to visit your blog soon!
xo
elyse
Thank you sooooooo much for this!! I’ve been trying to find a simple way to do this for ages without having to go into the html code!
=)
Thanks for the great tutorial. I had found a way to cheat so that my header looked centred but after creating a new one to match the badge I created, it was best to learn to centre it properly. I’ve had an appt. to visit this post in my calendar since I came across it in November so was finally able to put your tutorial to use. Thanks again for the great tips!
Thank you so much!!!
You are amazing! I’ve been searching for soo long for that answer! Thank you so much, you are a blog-saver!!
So thrilled it helped Sara!! :)
Thank you so much for sharing this tip! I’ve been trying to make my own template, and centering the title has been driving me crazy!!!!!!!!!!
Welcome Mary! SO glad it helped :)
Thanks for explaining this tip so well! Several other people had the same tip but they had me rooting around editing the CSS directly, whereas this elegant solution fixed my problem in a couple of minutes.
THANK YOU, THANK YOU, THANK YOU!
WELCOME!!!! :D
Thank you! This was super helpful !
Happy Saturday
Marie
I have having trouble finding out how to centre my blogger header, until I read this. Thank you so much. :D
So thrilled this helped you Ash!!! :)
Thank you so much for posting this easy to follow code! The CSS trick took 5 seconds for me! THANK YOU!
oh yay! SO glad it worked for you! :)
XO!
Thank you thank you! I found your tutorial via Google and it worked perfectly!
This doesn’t work for me, I don’t know what I’m doing wrong :( xxx
Brilliant! Thank you.
I searched & searched for what I was looking for and then, BAM, you had exactly what I needed :)
Thank you so much! I was wrestling with that one for a while! I have taken an extended vacation from blogging and have to learn how to do all of this again. Thank you so much for this post. Saved me from pulling my hair out!
Thanks so much! Your CSS code worked like a charm for my header image :)
Bear hugz,
Laura Lynn
Gah! You’re a life saver! THANK YOU
I’ve been looking for something like this tutorial for what seems like forever. And I’m glad I found it. Thank you for being awesome! Now i can do a lot with this, and get my blog up and running smoothly.
xxTiny
Thanks for your help!!
Do you have any other tips on here?
Would really be great help.
Thanks once again :)
thank you so much for this entry! anytime i google ‘how to….on blogger’ i come across tutorials that are either impossible to understand or you follow it to the letter and it still doesn’t work.
not this time! you make it so easy to understand and achieve the desired result.
THANK YOU for this tutorial! I was getting so frustrated that it wouldn’t center and was thankful to find this for help!
it worked!
thank you so much for this. it really helped me a lot.
This is great! Thanks so much I used it for my blog.
I love you! Thanks so much for this tip! You saved me from a hundred wrinkles and frowns. >hug<
:)
Thanks so very very much for this mega useful information! Had been struggling for a good couple of days trying to get my header sorted! Thanks again x
Thank you so much. You just saved me a ton of time in photoshop.
Laura
Welcome Laura! :)
Thanks a ton, this was really helpful :D !
Thanks so much for this blog post! It was really helpful.
THANK YOU! Worked a charm!
oh my gosh….thank youuuu soooo much for this!!!! I’ve been trying to figure out how to center my blogger for forever now. I went thru and did what you said and it still didn’t work….so then I read it again…and I realized I didn’t press “enter” after I entered the code snippet. I now have a nice, centered blog header. Thank you again!!!!
{I found your blog through goggle.}
Stacey
theyarbroughsblog.blogspot.com
You are so very welcome!!! :D
Thank you so much !!! I was about to start throwing things trying to get my header centered.
Thank You! This was the most straightforward and easy answer I found today. Everyone else has you running through the HTML looking for specific lines.
Welcome Tony!
THANK YOU SO MUCH FOR THIS!!!!! I’d been trying to do this for ages, just free styling my way around the edit section, changing the sizes of the pictures I was using, the width of my page, even my whole template! Then, I found this, and MY did it help!
Once again thank you so much for this!!!
Much love Niamh x,
Fire Walking From My Bedroom
thanks alot …ily for this <3
Thank you for this. I’m a first time blogger, learning every step of the way. Stumbling over little nuggets like this makes a world of difference. Your time invested in making this post is appreciated.
-Joshua
This was soooo helpful!!!! Thank you so much!
You my dear are a life saver, thank you for posting this!
Hi! I’ve tried to use this but it didn’t work, and I think it may have something to do with my adjusted widths of my blog. Is there any way you can help me out?
Rebecca
so helpful thank you!
After hours searching online to learn how to move a photo on my blogger blog, I finally stumbled upon your website. In a matter of seconds, you helped. Thank you so much for everything! HUGS – Stacey
Thank you so much! I just had to Google once, and yours results were on the first page and my first attempt and it worked! TQ!
Well done! My blog looks pretty enough.
Thanks, really I need this.
May the force be with you!
Greetings from Turkey.
Thank you!! Very helpful info!!
Exactly what I needed! Thanks tons!!!!!!!
Thanks so much for this so helpful!!
http://istylethereforeiiwear.blogspot.co.uk/
it works! Thank you…
This really helped, my blog looks better now! Thank you and have a nice day! ;)
This is soooooo amazing! Thanks for the tip! Love it!
thnx mate
thank you so much!!!!!!!!!!!!!!!!!!!!!!!!!!!!!!!!!!!!!!!!!!!!!!!!!!!!!!!!!!!!!!!!!!!!!!!!!!!!!!!!!!!!!!!!!!!!!!!!!!!!!!!!!!!!
Amazing!! Easy instructions and it worked perfectly…. a centred blog header :) Thank you!
This was helpful! after how many weeks of looking for how to do this.
Terima kasihhhhhhhhhhhhhh, thank u sooooooooooooooo much indeed.
It’s very helpful indeed …;this is d one i looked for.
And i know now how to manage that “look”
THANK YOU! This has been driving me crazy….appreciate your help :)
THANK YOU SO MUCH ♡
You are amazing! Thank you!
Thank you very much I have researched a lot on this explanation and fortunately I found it in your blog:)
Thank you so much!! Quick and easy and now it won’t drive me crazy anymore(:
thank you so much! this really helped me make my blog look more professional!!
just found this and thank you so so much! all the information was so easy to follow and a huge big help! thanks again! :) XXX
If I could kiss you over the internet I would! Just what I was looking for and it works, my header being just off to one side was stupidly annoying me – no more! Thank you so much. I’m going to look for ways to follow you/share this right now :-D
OMG!! this is so awesome!!! Thanks so much!! It worked like magic :D Im so happy!!!
May Allah bless you my dear <3
Thank you so much! This was driving me bonkers!
Thank you! Just what I needed to customize my blog
Thank you for this!
it doesn’t work for me :( don’t know what i’m doing wrong! i paste the code in the CSS box and apply it but nothing changes and the code is just written at the top!
PLEASE HELP?
Thank you, thank you, thank you! I think it’s centered better! (bookmarking this great “tip” place). And I do love your sweet butterfly header! I should have rounded the edges on my image but it’s OK for now… thanks again. Quick and easy peasy! {Ohhh, you might wanna add to delete any prewritten stuff in the Add custome CSS box before adding yours. at least mine had something already there to center but it sure didn’t look center, it looked more to the left align… in Blogger and I do use the picture window too!} Bless you … Peggy
THANK YOU!!!
OMGGGGG – i just googled “how to center header on blogger” and boom! – your steps are so simple to follow! :D
Loving your graphics as well!!! <3 THANK YOUUUU
Thank you sooooooooo much! It was driving me nuts that my banner was not centered and I am OCD so that makes it worse :) But I followed your steps and it is now centered. So thank you! Thank you thank you thank you!
Thank you! This helped me soooooooo much. I am OCD and seeing that my banner was not centered drove me nuts :) I followed your steps and my banner is now centered! Thank you thank you thank you!!
Ahhh this is brilliant – thank you!
THANK YOU!!!!!!!!! I have been messing with the logo at the top of my blog for HOURS!!!! You rock! normaltownnest.blogspot.com
Thank-you for this – it works wonderfully and my blog looks so much better.
James
tnx.
Oh my gosh! Thank you so much for that easy trick. Worked like a charm.
Ali x
This was perfect and so incredibly easy with your help! Thank you!!
Thanks so much!! That helped me a lot with my blogs.
This helped me so much, thank you!
thank you !!
May the road rise up to meet you.
May the wind always be at your back.
Thank you very much for the guiding simplicity
Thank you so much–you saved me so much time! I was tearing my hair out!
Great tut! Thanks!
Thank you so much!
Thank You so much :D
AHHH! Thank you so so so much!!!
Thank you so much for this!!!!! I am new to the whole HTML thing. I was so exited that this worked for me, and it was easy to understand your instructions too.
thanks it helped alot with my design
Thank you it worked perfectly
http://blackclassylongline.blogspot.com
Hello! This was simple and easy to follow! One thing worth adding maybe is that you have to erase the code that is already there, then add the new one :) I know its common sense to most, but I didnt do this first and then went back and did it and saw the centered banner after that! Thank you again!
Oh great, thanks for this. I’m not tech savvy but this was so easy to follow. Thanks Tiff
Thank you so so much!
This is great! Thank you!
thanks for this superb tip! :)
THANK YOU SO MUCH! I have been trying to figure out how to center my header picture for months now and have had no luck finding information, until your post! Now my blog doesn’t look crooked!
SO glad it Helped!!!
Happy non-crooked blogging!!! :D
Woot! Works like a charm, thank you!
Awesome!! WELCOME!! :)
Oh! Your article helps my blog be as my expectation. Thanks so much. :)
I tried a few other sites and only yours worked out. Thank you!
Thank you so much for this tutorial. :) Helped me a lot in centering the header of my other blog. Kudos!
thanks
Thanks, worked a treat! I like how you provide different options too :)
Thank you so, so much! I was having such a hard time until I found your post. Didn’t realize that different code was needed for “behind title and description”!
Dear Tiffany, tq soooo much. Your tips really help me!
This was so helpful! Thank you!!! :)
Thanks much! It was a huge issue before and now you gave us the solution! :-)
Thank you sooooo much! It was so easy, I was afraid it wouldn’t work. I found this when I was about to give up on getting my photo centered. Brava!
I’m just venturing out into the blogging world so this post was so so helpful and easy to follow! Thank you!
This post helped me so much! I searched everywhere on how to centre my header image on my blog and none were very helpful until I stumble upon your blog! This really helped me a lot, thank you! :)
Thank you so much for this!! It fixed all my problems :) #headacheisgone
thank you very much.
Thanks a ton! I have been looking around for such an awesome solution to center my blog header.! It worked n seconds!
But the page tab… It still is from the lefft most corner.. Any way to bring that to center too?
Thank you so much! This was exactly what I needed! So easy!
Yay! So glad it worked for you! :)
Thanks for the awesome tip!! Worked perfectly!
Awesome!!! Glad it helped! :)
thanks for your help
Thanks so much for sharing
thanks…you really a life saver… oppsss…a blog saver… ^_^…
Thanks! You’ve got amazing tips and this article helps me so much! :) You’ve got a follower and big fan also from Slovakia!!!
THANK YOU! :) LOL I have been working on this all day as a newbie. This was so easy. Wow.
I literally spent the last 3 days trying to figure out how to center my logo in my header. Finally I did what I swore I wouldn’t do, ask Google. Needless to say your very informative sight came up, and your instructions are clear and to the point and I fixed the issue in 30 seconds. I greatly appreciate this blog, and will be bookmarking it for future reference. Thanks a million, and a million again.
Thank you so much for your help to centre my header image!! I’ve pinned it for future reference! Thanks again!!!!! Blessings, Diane
welcome!! :)
omg thank you! This was driving me NUTS!
Amazing! I know this is from a couple of years ago but so helpful, thank you xx
Thanks for tips. It’s worked for my blog instantly :)
Thank you for saving my sanity and my header
thank u soo much!!!!
Thank you so much for sharing this! It was driving me nuts that my blog header (hlshop.blogspot.com) was off center and now it looks perfect!
Thanks, this really helped!!
good post for my help
It worked. Thank you!!!
This worked like a charm! Thank you for the help!
Thank you, it looks so much better now!
Thank you so much! I always forget how to do this. It is so nice to come here and have the instructions put out so easily for me to follow and understand!
Thank you so much for all the kind things you bless me with!
Thank you!! So simple and helpful
Laura x
Thank you so much! I have been trying to do this for hours, this was so easy and worked perfect :-)
So glad it worked for you!! :)
Omggg, this is so easy to make my header to center, i dont have to edit html.
Thank you so much! You help us a lot! Thank you! :D
Thanks! This worked for me !
@ Thepracticalmomblog.blogspot.in
hey thanks
it worked for me
Hooray…thanks! Easy peasy!
Thank you so much for this info. I was breaking my head over how to center my header.
You ROCK!
Thank you this was super helpful!
Just read your centre header text advice. Very helpful thank you.
Nice its works code…i applied on my blog….centering header image
Oh my gosh, thank you so much! Simple and easy to understand.
Thank you so much!! It is so easy to understanding~ Help me a lot!
Thank you !
Thank you so so so so much!!!!
Thank you so much! I was starting to pull my hair out!!!!
Thank you for helping me center my blogspot title!
Thank you so much for this!!!! I have been trying to figure out how to get my header centered for MONTHS!!!! Annie @ Plus Size to Downsized
Thank you for helping me center my blogspot title!
thanks so much
Worked like a charm – THANK YOU!!!
Was searching for this every where. Thanks so so so so so much
That was a piece of cake! Thanks SO much:)
Thank you very much!!!
Igal
thanks
WOW! I hadn’t messed with my blog’s layout in ages. This new CSS thing is awesome! Go Technology!
Thanks so much for the tip.
thanks so much it really works on my blog
itsladymieh.blogspot.com
booyah, it works
Thank you very much
Worked like a charm! Thanks:)
Thanks a lot. Been trying to do this for ages. TTFN
Omg I love you so much for this. Thank you.
Thanks, nice posting. It really help me alot :)
Thank you. I tried it and its work…nice posting…
Thank-You!!!
Thank u! your post is sooooooo useful for me!
I believe that I can make my blog myself because your kind tip!
Thank u very much
Thank you! It worked.
Thanks!! This is really a help.
This was very helpful. Thanks!
Thank you so much! This was so so helpful! I was going crazy trying to work out how to make my header centered!